Seasonal Veggie of the Week: Kale (#2)

Check out this week’s second recipe for Kale Week! Both kale and sweet potatoes start coming into season in Ontario this month, so this is the perfect opportunity to use a bit of both in the recipe below. But before you get cooking, take a look at these quick tips on how to cut kale before cooking with it.

  1. Fold each leaf in half over the stem, making sure that the topside of the green is folded inwards
  2. Cut the folded leaf away from the stem and discard the stem
  3. Cut the leaves up into the desired size according to your recipe


Sweet Potato and Kale Chili

sweet potato kale chili

Serves: 4

Time: 40 minutes

Ingredients

  • 2 medium sweet potatoes – peeled and chopped into 1 inch cubes
  • 1 tbsp olive oil
  • 1 onion diced
  • 2 garlic cloves minced
  • 1 red chili finely chopped
  • 1/2 tsp cayenne pepper (Optional – for extra heat)
  • 1/2 tsp ground cinnamon
  • 1 tsp ground cumin
  • 400 g tin of kidney beans – drained and rinsed
  • 400 g tin of chopped tomatoes
  • 2 large handfuls of kale
  • Salt & pepper , to taste

Directions

  1. Heat the olive oil in a large saucepan and add the sweet potatoes, onion and garlic. Cook on a medium heat for 5 minutes until the veg has softened slightly.
  2. Stir in the chili, cayenne pepper, cinnamon and cumin and cook for a futher couple of minutes.
  3. Add the kidney beans and chopped tomatoes, stir to coat the vegetables thoroughly then simmer gently for 30-35 minutes. Add a little water if it becomes too thick.
  4. At the last minute, add the kale. Don’t over cook it, just let it wilt slightly so it retains colour and texture.
  5. Season with salt and pepper and enjoy!

Source: http://wallflowerkitchen.com/sweet-potato-kale-chilli/

Seasonal Veggie of the Week: Kale

Welcome to Week 4 of our Seasonal Fruit/Veggie of the Week series! This week’s seasonal veggie of the week is quite popular, but still tends to cause a bit of confusion in the kitchen: Kale.

Kale is a vegetable in the cabbage family, originating from the Eastern Mediterranean and Asia Minor where it has been cultivated, eaten and used for medicinal purposes for over 4000 years. In addition to being cooked in food, it was also used to treat bowel problems by the ancient Greeks. It was introduced to western Europe by the 1200-1300s. Like cabbage, kale is an extremely hearty vegetable that is easy to grow and can tolerate cooler climates. It first comes into season in June, but can continue to be harvested until the ground freezes in early winter. Because it is so hearty, kale has historically been consumed most during times of famine and food shortages.

Kale was first brought to Canada by Russian traders in the 1800s, but it only started to become more popular in Canada as an edible vegetable in the 1990s. Kale has since become extremely popular as a “super food” in North America because of its important nutrient content. 1 cup of chopped kale provides you with 134% of your body’s daily Vitamin C requirements and 133% of your Vitamin A requirements.


Kale Pesto Pizza

kale-pesto-pizza-recipe-550x757

Makes: 1 large pizza

Time: 30 minutes

Ingredients

Pizza:

  • 1 batch/1 lbs pizza dough
  • 2 cups (8 ounces) grated mozzarella cheese (or vegan mozzarella to make vegan, ex. Daiya mozzarella style shreds)
  • 1 cup lightly packed kale, chopped into small, bite-sized pieces
  • 1 teaspoon olive oil
  • Optional garnishes: red pepper flakes

Kale Pest (yields about 1.5 cups):

  • 3 cups (about 1 small bunch) packed kale, thick ribs removed and roughly chopped
  • ¾ cup pecans or walnuts
  • 2 tablespoons lemon juice (about 1 small lemon)
  • 2 to 3 cloves garlic, depending on their size
  • ¾ teaspoon salt

Directions

  1. Preheat oven to 500 degrees Fahrenheit with a rack in the upper third of the oven. If you’re using a baking stone or baking steel, place it in the oven on the top rack. If you’re using store-bought dough, check the instructions of the package. It might need to rest at room temperature while you work on the pesto.
  2. Make the pesto: In a food processor, add the kale, pecans/walnuts, lemon juice, garlic, salt and several twists of freshly ground black pepper. Turn on the food processor and drizzle in the oil. Process until the pesto reaches your desired consistency, stopping to scrape down the sides as necessary. Taste and add more lemon juice, salt or pepper if necessary.
  3. Prepare the pizza dough as directed. If you’re using store-bought dough, I’d roll it out into one large pizza. I like to roll out the dough on pieces of parchment paper for easy transfer to the oven. For best results, roll the dough out as thin as reasonably possible while maintaining an even surface level.
  4. Top pizza with an even layer of pesto (you may end up with extra pesto, which would be great on pasta or as a sandwich spread, etc.). Sprinkle cheese over the top. Lastly, in a small bowl, toss 1 cup chopped kale with 1 teaspoon olive oil and a sprinkle of salt. Rub the oil into the kale so it’s covered with a light, even layer. Distribute the kale evenly over the top of the pizza.
  5. Transfer pizza to the oven, either on a baking sheet or onto your preheated baking stone. Bake until the crust is golden and the cheese on top is bubbly (about 10 to 12 minutes on a baking sheet, or as few as 5 minutes on a baking stone). If desired, top pizza with a light sprinkle of red pepper flakes. Slice and serve.


Source: https://cookieandkate.com/2016/kale-pesto-pizza-recipe/

Seasonal Veggie of the Week: Bok Choy (#3)

Welcome to recipe #3 of Bok Choy week! We were selling some lovely large bok choy at yesterday’s market for $2.00 per head. Check out the pictures up on our Instagram account: goodfoodmarket_gbc.

Remember that large bok choy can often be used in the same recipes as baby bok choy. As the name suggests, baby bok choy is simply bok choy that hasn’t reached full maturity. Many people find it easier to use because it can be cooked whole without the need to cut it up. It also has a somewhat sweeter flavour than fully mature bok choy.


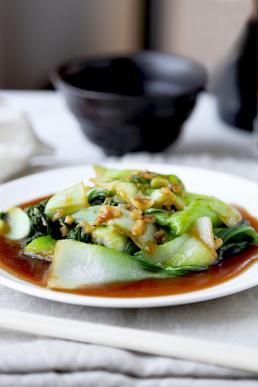
Bok Choy with Garlic and Sauce

bok-choy-1OPTM

Serves 4

Time: 10 minutes

Ingredients

  • 3 cloves garlic minced
  • 1 tablespoon canola oil
  • 16 ounces bok choy or baby bok choy
  • 1 1/2 tablespoons oyster sauce (for vegetarian/vegan version, use Hoisin)
  • 1 teaspoon dry sherry or shaoxing wine
  • 1 teaspoon soy sauce
  •  ground black pepper to taste

Directions

  1. Bring a pot of salted water to boil and add bok choy. Boil for 1 minute and drain. Rinse under cold water and drain again. Set aside.
  2. In a pan over high heat, add oil and garlic and cook for 1 minute. Add bok choy and all the other ingredients and cook for 2 minutes.
  3. Turn the heat off and transfer bok choy and sauce to a plate. Serve immediately.

Source: https://www.pickledplum.com/bok-choy-garlic-oyster-sauce/

Seasonal Veggie of the Week: Bok Choy (#2)

Welcome to recipe #2 of Bok Choy Week! If you’re not sure how to clean and prepare large bok choy before using it in your cooking, here are 5 simple steps to follow:

  1. Trim off and discard the ends of the stems
  2. Wash the entire bok choy, or the quantity you intend to use, under cold water, paying special attention to the bottoms and groove of the stems where dirt often collects
  3. Cut and separate the leaves from the stems
  4. Cut the stems into 1/2 inch pieces
  5. Start cooking the stems first since the leaves cook faster

Note: These instructions are best suited to large bok choy. Baby bok choy is often cooked whole, though you will still need to wash them and possibly trim the bottom.

Many of the ingredients for today’s recipe are regularly available at our market: Garlic, ginger, sweet potato, bok choy.


Thai Curry Vegetable Soup

Thai-Curry-Vegetable-Soup-V1

Serves: 4

Time: 30 minutes

Ingredients

  • 2 Tbsp neutral (low flavour) cooking oil
  • 2 cloves garlic
  • 1 Tbsp grated fresh ginger
  • 2 Tbsp Thai red curry paste
  • 1 small sweet potato (about 1 lb.)
  • 1 bunch baby bok choy (or equivalent large bok choy)
  • 4 cups vegetable or chicken broth
  • 13 oz can coconut milk
  • 1/2 Tbsp fish sauce (optional)
  • 1/2 Tbsp brown sugar
  • 3.5 oz rice vermicelli noodles

Garnishes (Optional)

  • 1/2 red onion
  • 1 lime
  • Handful fresh cilantro
  • Sriracha to taste

Directions

  1. Prepare the vegetables for the soup and garnishes first, so they’re ready to go when needed. Mince the garlic and grate the ginger using a small-holed cheese grater. Peel and dice the sweet potato into one-inch cubes. Wash the bok choy well, then chop into one-inch strips, separating the fibrous stalks from the delicate green ends. Thinly slice the red onion and roughly chop the cilantro.
  2. Add the cooking oil to a large soup pot along with the minced garlic, grated ginger, and Thai red curry paste. Sauté the garlic, ginger, and curry paste over medium heat for 1-2 minutes.
  3. Add the diced sweet potato and chopped bok choy stalks to the pot (save the leafy green ends for later) along with the chicken or vegetable broth. Bring the pot to a boil over medium-high heat, then reduce the heat to low and let simmer for 5-7 minutes, or until the sweet potatoes are tender.
  4. While the soup is simmering, bring a small pot of water to a boil for the vermicelli. Once boiling, add the vermicelli and boil for 2-3 minutes, or just until tender. Drain the rice noodles in a colander and set aside.
  5. Once the sweet potatoes are tender, add the coconut milk, fish sauce, and brown sugar to the soup. Stir, taste, and adjust the fish sauce or brown sugar if needed. Finally, add the bok choy greens and let them wilt in the hot soup.
  6. To serve, divide the rice vermicelli among four bowls. Ladle the soup and vegetables over the noodles, then top with red onion, cilantro, a wedge or two of lime, and a drizzle of sriracha.


Source: https://www.budgetbytes.com/thai-curry-vegetable-soup/

Seasonal Veggie of the Week: Bok Choy

Welcome to Week 3 of our Seasonal Fruit/Veggie of the Week series. We hope that you’ve been enjoying these recipes so far! This week’s seasonal veggie of the week is Bok Choy, a hearty vegetable that starts coming into season in Ontario in June.

Bok choy is a type of cabbage originally native to China. Other names used include “Chinese cabbage”, “Chinese savoy”, pak choy, pok choi, bai cai, xiao bai cai, Shakushina, cai thia, and cai trang con. Written evidence dates its cultivation back to at least the 15th century, but archaeological evidence suggests it may have an over 6000-year history. This would make it one of Asia’s oldest cultivated vegetables. Bok choy is high in vitamins C and A, and so has also been used as a medicinal plant to treat coughing, fever and stomach illness.

Bok choy grows well in colder climates and can be grown here in Canada. Chinese immigrants first brought the vegetable to North America in the 1800s, and bok choy has been grown in Ontario for at least 40 years.

For those new to using bok choy, try out this classic beef stir fry recipe:


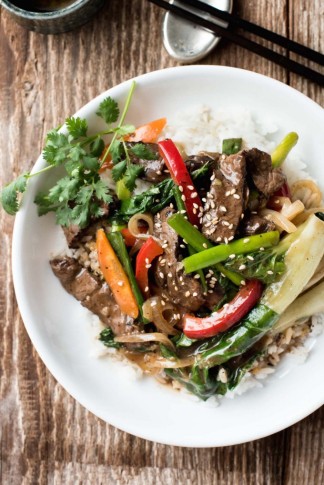
Easy Classic Chinese Beef Stir Fry

Easy-Classic-Chinese-Beef-Stir-Fry_1-680x1018

Serves: 2

Time: 23 minutes

Ingredients

Sauce:
  • 3 tsp cornstarch/corn flour
  • 2 tbsp + 1/3 cup water, separated
  • 2 tbsp soy sauce (Use ordinary all-purpose soy sauce such as Kikkoman)
  • 1 tbsp oyster sauce (optional)
  • 2 tbsp Chinese cooking wine or dry sherry (or substitute with chicken broth)
  • 1 tsp white sugar
  • 1/2 tsp sesame oil (optional)
  • Dash of black pepper
Stir Fry:
  • 2 tbsp peanut oil
  • 1 garlic clove , crushed
  • 7 oz / 200 g beef , thinly sliced (Cut against the grain, this ensures tenderness)
  • 1/2 small onion , sliced (yellow, brown or white)
  • 1/2 red bell pepper, sliced
  • 1 small carrot , halved lengthwise and sliced thinly on the diagonal
  • 3 baby bok choy, quartered lengthwise (or equivalent large bok choy)
  • 2 stems scallion/shallots , cut into 1.5″/3cm pieces
To Serve
  • Steamed white rice
  • Sesame seeds (optional)
  • Fresh cilantro / coriander (optional)

Directions

  1. Combine the cornstarch and 2 tbsp of water in a small bowl, mix until smooth.
  2. Mix in remaining Sauce ingredients except for the 1/3 cup water.
  3. Place the beef and 2 tbsp of sauce in a bowl and mix gently. Set aside for 15 minutes.
  4. Add 1/3 cup water into the remaining sauce. Set aside.
  5. Heat oil in wok over high heat. Add garlic and cook for 15 seconds.
  6. Add onion and cook for 1 minute.
  7. Add the beef and cook until it changes colour from red to light brown but not cooked through.
  8. Add bell pepper and carrots and stir fry for 30 seconds.
  9. Add sauce and cook for 30 seconds.
  10. Add bok choy and scallions/shallots and cook for a further 1 minute until the sauce is thickened.
  11. Remove from heat immediately.
  12. Serve with rice, garnished with sesame seeds and cilantro, if using.


Source: https://www.recipetineats.com/easy-classic-chinese-beef-stir-fry/

Seasonal Fruit/Veggie of the Week: Rhubarb (#2)

Welcome to recipe #2 of Rhubarb Week! If you’re unfamiliar with how to use rhubarb, the classic way of using it is in a rhubarb pie. Below you’ll find a recipe for a classic rhubarb crisp.

While using rhubarb in your cooking, remember that the stalks are mildly poisonous so make sure only to consume the stalks when cooked. The leaves and roots themselves must always be removed and never consumed as they are quite toxic.


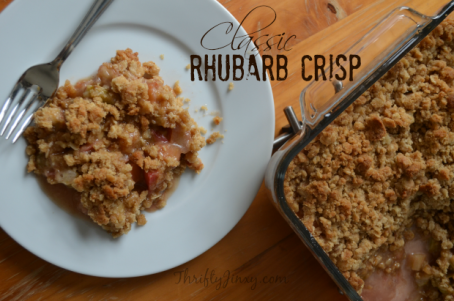
Classic Rhubarb Crisp

Classic-Rhubarb-Crisp-Recipe-from-Thrifty-Jinxy

Ingredients

Rhubarb Layer:
– 4 cups of rhubarb cut into 1/2″ pieces
– 1 cup sugar
– 1/3 cup flour
– 1/2 tsp cinnamon

Topping:
– 1/2 cup butter, melted
– 1/2 cup old fashioned oats
– 1 cup flour
– 1 cup brown sugar
– 1/2 tsp salt
– 1/2 tsp cinnamon

Directions

  1. Heat oven to 375 degrees.
  2. Mix rhubarb, sugar, 1/3 cup flour and 1/2 tsp cinnamon in an 8? x 8? glass baking dish
  3. Mix butter, oats, 1 cup flour, sugar, salt and 1/2 tsp cinnamon in a medium bowl.
  4. Sprinkle topping over rhubarb mixture.
  5. Bake for 30 minutes – 35 minutes.


Source: https://thriftyjinxy.com/classic-rhubarb-crisp-recipe/

Seasonal Fruit/Veggie of the Week: Rhubarb

Hi folks, welcome to Week 2 of our Seasonal Fruit/Veggie of the Week series. This week’s in-season local produce is Rhubarb. It is one of the first fruits and vegetables available for harvest in Ontario in the spring, and so is considered a seasonal treat like asparagus.

Rhubarb is a vegetable native to China that was originally cultivated for medicinal purposes in ancient times. It was used as a purgative for digestive issues. While the plant was also known for its medicinal properties in Greece and the Middle East, it did not become more widely known in Europe until the 14th century when it was imported from China through the Silk Road. It was first brought to North America by European colonizers in the 18th century.

Today, rhubarb is primarily used in desserts and baking. Now that the weather is heating up again, you may want to try this recipe for a refreshing rhubarb lemonade


Sparkling Rhubarb Lemonade

rhubarb2-0131

Ingredients

  • 1 1/2 cup chopped rhubarb
  • 1 1/2  cup water
  • 3/4 cup sugar
  • 1 ( 6 ounce ) can frozen pink lemonade
  • 2 fresh lemons
  • 16 -20 ounces lemon-lime soda

Directions

  • Bring the rhubarb, sugar and water to a boil.  Simmer 5-10 minutes.
  • Strain the mixture and discard the solids.
  • Add the frozen lemonade and the juice from one fresh lemon; chill until cold.
  • When ready to serve add the soda.  (You can add more water/soda depending on how tart/sweet you like it.)
  • Slice the remaining lemon for serving.  Pour lemonade over ice and add lemon slices.


Source: http://www.caramelpotatoes.com/2013/05/14/sparkling-rhubarb-lemonade/

Seasonal Veggie of the Week: Asparagus, Tomato and Feta Couscous (#3)

Hi all,

Welcome to our last post for Asparagus Week! If you haven’t checked out our two previous asparagus recipes yet, be sure to take a look on the main page. The recipes were a simple and affordable Oven Roasted Asparagus and an amazing Roasted Asparagus and Mushroom Carbonara. So, without further ado, here is today’s recipe:


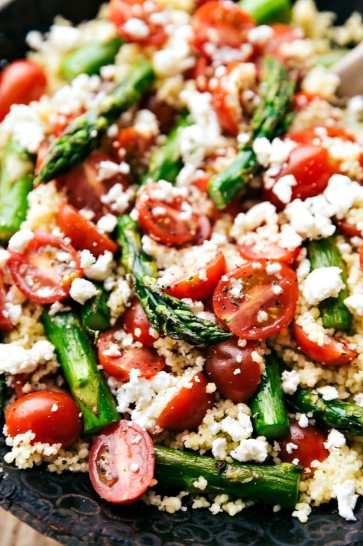
Roasted Asparagus, Tomato and Feta Couscous

Asparagus-Couscous-Salad


Serves 6 as a side salad

Time: 32 minutes

Ingredients

  • 1 bunch fresh asparagus
  • Salt and pepper
  • 1 fresh lemon
  • 1 package (5.8 ounces) Roasted Garlic and Olive Oil Couscous (Near East mix or substitute with 1 cup plain cooked couscous)
  • 3 tablespoons balsamic vinegar
  • 4 tablespoons olive oil, separated
  • 1/2 teaspoon minced garlic
  • 1 teaspoon Dijon mustard
  • 1/2 tablespoon honey
  • 1/2 of 1 container (10.5 ounces) ripe cherry tomatoes, sliced
  • 1/3 cup feta cheese, crumbled

Directions

  1. Preheat the oven to 425 degrees F. Break off the woody ends of the asparagus. Toss the asparagus, 2 tablespoons olive oil, about 1 teaspoon salt, and 1/2 teaspoon pepper (or to taste) together on a large sheet pan.
  2. Bake in the oven for 12-17 minutes (depending on the asparagus thickness), flipping the spears once halfway into the cooking time. Remove and squeeze 1 tablespoon lemon juice over the spears. Allow to cool and chop into 2-inch pieces.
  3. Meanwhile, prepare the packaged couscous according to package directions. Allow to cool.
  4. While the asparagus is cooking, prepare the dressing. Pour the vinegar in a small saucepan over medium heat. Bring to a boil and reduce until the vinegar is halved (about 1 and 1/2 tablespoons). Allow to slightly cool and toss with the remaining 2 tablespoons olive oil, minced garlic, Dijon mustard, and honey. Briskly whisk and season with salt and pepper (about 1/2 teaspoon salt and 1/4 teaspoon pepper, or to taste).
  5. Halve the cherry tomatoes.
  6. Add the cooled couscous, cooled chopped asparagus, and cherry tomatoes to a large bowl. Lightly toss. Add dressing to taste and another fresh squeeze of lemon if desired. Lightly toss again and then top with the crumbled feta cheese. Enjoy immediately.
  7. If you don’t plan on eating all of the salad, only dress what you will eat (this salad doesn’t sit well with the dressing for an extended time).

Source: https://www.chelseasmessyapron.com/roasted-asparagus-tomato-feta-couscous/

Seasonal Veggie of the Week: Asparagus (#2)

Welcome to recipe #2 of Asparagus Week! We have good news for you today, because some Ontario asparagus has just come available to us here at the St. James Campus Good Food Market! That means you’ll be able to find some fresh asparagus at our market next Thursday June 7.

If you do plan to bring home some fresh asparagus, keep in mind it will generally only last 5-7 days in the fridge.

To keep your asparagus fresh for as long as possible, try the following:

  • Cut 1 inch off the ends
  • Stand spears in a glass container with about 1-2 inches of water
  • Use a plastic bag to loosely cover the asparagus
  • Store in refrigerator
  • Change water if you notice it becoming clouded


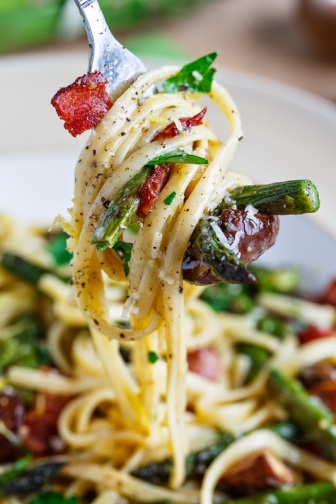
Roasted Asparagus and Mushroom Carbonara:

Roast Asparagus and Mushroom Carbonara

Roasted asparagus and mushrooms in a creamy and cheesy egg sauce with plenty of fresh cracked black pepper.

Serves 4

Time: 50 minutes

Ingredients

  • 1 lbs asparagus, trimmed and cut into bite sized pieces
  • 8 oz mushrooms, quartered
  • 1 tbsp olive oil
  • Salt and pepper to taste
  • 8 oz fettucine (or pasta of choice)
  • 1 clove garlic, chopped
  • 2 eggs
  • ½ cup parmesan
  • Plenty of fresh cracked black pepper
  • Salt to taste
  • 1 tbsp parsley, chopped

Optional: 4 oz bacon cut into 1-inch pieces or 4 oz pancetta, diced

Directions

Toss the asparagus and mushrooms in oil, salt and pepper, place on baking sheet in a single layer and roast in a preheated 400F/200C oven until they start to caramelize, about 20-30 minutes, mixing half way through.

  1. Start cooking the pasta as directed on the package.
  2. If using meat option, cook the bacon in a pan, pour off all but a tablespoon of the grease from the pan, add the garlic, cook for 30 second and turn off the heat.
  3. Mix the egg, cheese, pepper and salt and parsley in a bowl.
  4. Drain the cooked pasta reserving some of the water.
  5. Mix the pasta, egg mixture, asparagus and mushrooms into the pan with the bacon (if using meat option), adding reserved pasta water as needed.

Note: To speed things up, about 20 minutes into roasting the asparagus and mushrooms, get your pot of water for the pasta on the stove and start bringing it to a boil.

Source: https://www.closetcooking.com/2014/06/roasted-asparagus-and-mushroom-carbonara.html

Seasonal Veggie of the Week: Asparagus

Hey folks,

Starting this week, we’ll be running a new Seasonal Fruit/Veggie of the Week edition. Every week, we’ll be choosing one local Ontario fruit or vegetable in season during that particular month. We’ll be posting information and recipes for that veggie three times per week.  This week’s local veggie is asparagus! Hope you enjoy!

Asparagus, also known as Asparagus officinalis, garden asparagus or sparrow grass, is a flowering perennial plant native to the East Mediterranean (Greece, Asia Minor, the Middle East and Egypt). It was considered a particularly sacred plant in ancient Greece and was used for several medicinal purposes related to digestion including as a diuretic and for urethral pain. By the 16th century, it had become popular among the western European nobility and was grown almost exclusively for them.

Asparagus was first introduced to North America by European colonisers in the 18th century and grows best in wet or coastal regions. In Ontario, asparagus comes in season in May and June. It can easily be roasted, steamed or grilled as a part of a delicious spring meal!

The ends of asparagus are woody and need to be trimmed off before cooking. The woody ends can be snapped off using your fingers and will naturally break right where the woody end begins. To save time, you can always snap one and then use it as a guide to trim the rest of the bunch.

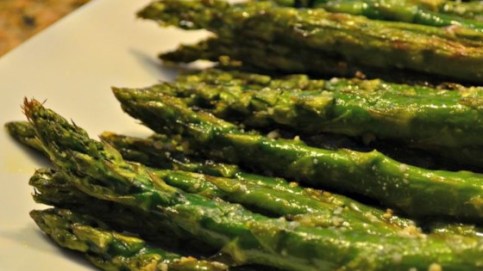
Simple Oven-Roasted Asparagus:

1001600

This recipe can be used as an appetizer or as a part of a main course. Goes well with chicken, steak, fish or mock meat equivalents.

Serves 2

Ingredients:

  • 1lbs bunch of asparagus (20-30 spears)
  • 2 tablespoons olive oil
  • Salt

Directions:

  • Wash asparagus and trim stalks
  • Coat bottom of baking pan with olive oil
  • Lay spears of asparagus across baking pan
  • Lightly sprinkle salt
  • Put in oven at 325-350F
  • Flip asparagus spears half way through cooking time
  • Let roast for 30 minutes or until soft and slightly crispy
  • Remove from oven and serve